Sabtu, 16 Januari 2010

Float Plane Photos - January 16, 2010


I was excited to have my wife go with me to fly my floatplane today. We took along the Nikon F5 and I showed her how to use the camera. She turned out to quite a natural behind the lens. The photos are a little grainy since I scanned the 4x6 inch prints.

Storms were coming in from the Gulf of Mexico. The wind was blowing probably a constant 15 miles per hour with 20 mile per hour gusts. I don't mind flying in the wind. I have always said, "Where I grew up (in the Texas panhandle), if you don't fly in the wind, you don't fly." The wind always blew there!


I got the airplane started and put it in the water. I throttled up and she got a great photo of the water spraying from the floats and of the takeoff (See Photos 1-3 Click on the photos to make them larger).

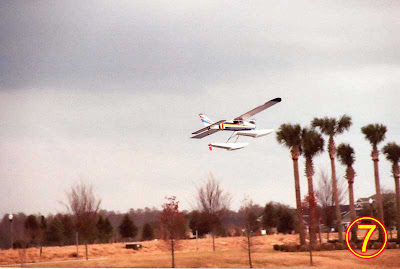
I made a few low passes so my wife could photograph the airplane in the air (See Photos 4-7).


After flying for a while and making some low passes, a loop and a touch and go, I landed the plane. I didn't want to keep my wife out too long. In Photo 8, I had just landed and I taxied back into the wind to bring the plane to the shore. In Photo 9, you see some grass sticking up out of the water. I throttled up and skimmed right over the grass and onto the shore (Photo 10).

This little lake that I have designated "Float Plane Lake Number 3" is going to be a lot of fun!


Rabu, 13 Januari 2010

Flying Day


I joined the Radio Control Association of Central Florida (RCACF) on Saturday January 9, 2010. I got my membership card and made arrangements with one of the club members, Fred Hale, to give me a check out flight. I took my Bridi Dirty Birdy. I had run the engine here at the house and had done some taxi tests with the plane. I got to field and I met Don Lowe! Don has been one of my heroes in the RC world. He was a bomber pilot in WWII and he has been president and vice president of the Academy of Model Aeronautics. He has an impressive resume. I was thrilled to get to meet him. He graciously let me take his photo.

I had agreed to meet Fred at the field at 1:30 and I got there early so I could have my plane fueled up and ready to go. Well, as luck would have it, I had fuel problems. The plane would not start. I checked the glow plug and it was bad. I changed that but still couldn't get the plane to start. It acted like the fuel line had come off. So, I took the front gear out of the plane and then we discovered that the clunker was stuck. We got that fixed, got the nosegear in and then got the plane started. The idle was running rich and we leaned that out some but the engine still wasn't running great. I went ahead and took off.


I have only flown the Dirty Birdy once  and I had to land without power. I didn't make it back to the runway and buggered the plane up. I got it all fixed and have it ready to fly. When I got in the air, I got it trimmed out. The plane had originally been pretty nose heavy. I added some lead to the back of the fuselage but the plane felt just a little tail heavy. I've got to take a couple of the weights off to get the balance where I am more comfortable with it. I came in to land and the plane just floated like crazy. The idle was set a little too high and I had a hard time getting the plan on the runway. I went around about four times and finally put it down way on the opposite end of the runway. I was nervous flying a new plane which is nothing new for me and I was really nervous having Fred watch me. I really appreciate him coming out. He has a cold and wasn't feeling well at all. He got me all checked out and I'm ready to go now though. I brought my Giles 202 in and I am going to get it ready to fly. I took the receiver out the other day and I need to put that back in. I can have it ready to fly tomorrow.

Jumat, 08 Januari 2010

SUCCESS!!!


Wow! That was fun! I took the float plane to a large pond about two miles from where I live. I have to admit I was nervous. This is a first for me, to fly off of water.


I had been by the retention pond earlier in the day and the wind was out of the southeast. Well, now it was out of the northwest. I had decided upon a place to launch the plane but had to change that. That was no problem. The banks weren't too muddy. I fueled the plane and sat it in the water. I have been afraid that, sitting on the ground, the plane will rest on the water rudder. It doesn't, it rolls forward to the front of the floats. This was a nice surprise. After my last little crash with the trainer, the throttle linkage had come undone. I put it all where I thought it should be and the throttle ended up being better than before. I fueled the plane, started her up and put her in the water.


I taxied around for a little bit to see how the water rudder worked. It worked well! I had probably a small 12 to 15 mph crosswind which required a little extra throttle when turning out of the wind. Everything seemed to be working well so I pushed the throttle forward and the plane hurried across the water. The floats rose up out of the water and the plane wanted to take off prematurely. I pushed the nose down to make sure I had ample airspeed to get airborne. I have heard stories that floats will "stick" to the water. I guess it is due to the surface tension of the water. Well, mine did. It wasn't really a problem, it just takes a little extra elevator to lift off. Then once the plane leaves the water, you have to push the nose down. I like flying with a little wind. I always tell people, "Where I grew up (the Texas panhandle), if you don't fly in the wind, you just don't fly." I actually test flew my Goldberg Skylark 56 Mk II ARF in 25 mph gusts.


The floatplane felt a little tail heavy to me. Always remember, it is better to be just a little nose heavy than to be a little tail heavy. The tail heaviness was with a full tank of fuel. The center of gravity falls about an inch or two behind where it does on the plane without floats. I will add weights to the front of the floats so that the center of gravity will still be correct when I take the floats off and put wheels back on. As with any flat bottom wing, turning into the wind causes the airplane to balloon! I did some slow speed, low passes over the water before I attempted a landing. Wow, this thing really slows down. I can have so much fun with a trainer. After flying sport and pattern planes, all RC pilots could enjoy getting back to the basics. When I made my landing approach, I came in low over my pickup and floated the plane in and adding just a touch of throttle at landing, the airplane landed very smoothly. I shot a few touch and goes and then landed to check my fuel situation. With any new plane it is important to know how long you can fly before running out of fuel. I didn't want to have to bring this thing in deadstick in the weeds and tear up all the work I've done! By this time, it was starting to mist outside. I took the wings off the plane and put it in my pickup. I sat there for awhile and the mist slowed down so I put the wing back on and flew the airplane again. After a few more touch and goes, the mist was starting to turn to rain so I decided it was time to pack it up.

The retention pond had some cat tails in a couple of spots that I had to avoid. They would do a job on a wing if you hit them hard. When I was taxiing back to the shore, I couldn't turn out of the wind and ended up against the cat tails. The only thing to do was go after the plane. I pulled everything out of my pockets and went in. The water was up to my ribs and it is probably in the high 40's today. The water really wasn't too bad. I got the plane loaded up, got home and got a shower!

On one of the touch and goes, the left float "slapped" the water and I noticed when I put the plane in my truck that some of the Monokote is torn off. I know Monokote is not designed for this type of use but I REALLY don't want to have to  paint these floats. I will assess the damage later and iron on more Monokote.

As far as flying at sea level, I could definitely tell a difference. I normally use an 11x7 propeller on my .61 engines. For this plane with the floats, I decided to go with a 12x6. This gives a better climb performance which I figured can't be a bad idea considering the plane is not only pulling the extra weight of the floats but also the extra drag. The climb out was incredible because of the elevation and the prop. Then, when I was on landing approach, the airplane would really float. I had to go around two or three times and come in right over my pickup and I was still landing about half way out in the pond. I am used to planes dropping like a rock, especially on really hot days. 

Overall, this was a great experience. I am going to LOVE float flying!

Kamis, 07 Januari 2010

My Float Plane is Ready!!!


This has taken much longer than I had planned. I had these styrofoam floats and I started fiberglassing them to go on my .60 size Tower Hobbies trainer. Well, I don't know if you have ever fiberglassed an airplane before but it is a major pain. Every time I do this, I swear I'll never do it again. It just gives such a beautiful finish once it is done. In this case, with the floats being styrofoam, I really wanted to make them stronger, especially when I sit the plane in the grass to start it. I don't want little sticks poking holes in the bottom of the floats.


To fiberglass the floats, just like an airplane, I started with finishing cloth that is like less than one ounce for a yard of material. It is VERY light and thin but strong. You cut the cloth and lay it on the sides, the top and the bottom all separately and brush on epoxy resin. When I fiberglass balsa, I like to add just a little alcohol to thin the epoxy. I've heard stories that too much alcohol and the resin will never harden. I use regular 30 or 45 minute epoxy from the hobby shop and it is almost too thick to use without being thinned. With the foam, I can't use alcohol because I'm afraid it will melt the foam. You can buy "finishing resin" which is usually a polyester, two part, resin. I've heard that polyester tends to shrink a little as it cures but I doubt it would be any problem with an RC plane. After I got the cloth and resin on the floats, I decided the top and bottom of the floats needed to be a little stronger so I put 3/4 ounce cloth on them. I left the sides with just the finishing cloth.


I had originally thought I would go ahead and paint the floats but by this time I am sick of the whole fiberglassing process so I decided to use Monokote on them, on top of the fiberglass. My belt sander made quick work of sanding the resin. When using paint on a fiberglassed surface, I sand until the surface is as smooth as I can get it without cutting through the cloth. Then I shoot the part with primer. Once it is dry, I sand it almost completely off, leaving it only in the low spots. I may repeat this step three or four times, however long it takes to get the fuselage smooth and without imperfections. Then I shoot the paint.

I think I just don't like finishing planes. I want to fly them so badly, I don't have the patience to get through the finishing step. I had a buddy in Salt Lake City that could work miracles with Monokote. I've never seen anything like it. I admire people like that that have so much patience! I got all the Monokote on the floats today and decided not to put any decorative stripes on them. It is almost 2 am and I am just finishing up. The fancy stripes can can wait!


I used nylon nose gear blocks to mount the axles and they are going to work great. I also made separate landing gear wires for the floats. I was originally going to use the main gear in conjuction with the floats but changed my mind.

I am using a flexible cable for the water rudder. It is permanently attached to the floats but I am going to tape it to the side of the fuselage so I don't have any permanent brackets on the fuse. I will see how that works.

I am seriously thinking about flying her tomorrow. It will be cold in the morning but afternoon should not be too bad. I'll let you know how it goes!

Selasa, 05 Januari 2010

New Facebook Group for RC Enthusiasts


I have just started a new Facebook group for anyone interested in Radio Controlled Aircraft. Click Here to check it out. It is open to everyone!

Purposes of the Group:
  1. Make friends with other people that are interested in Radio Controlled Aircraft.
  2. Let people know where they can fly in their area and meet other pilots and people who are interested in Radio Controlled Aircraft.
  3. Share tips and tricks for building, flying and maintaining Radio Controlled Aircraft.
  4. Let people know about upcoming events in the Radio Controlled Aircraft community.
  5. Share your thoughts and ideas about Radio Controlled Aircraft.
  6. Brag on your Radio Control Aircraft and share photos with each other.
Come on by and join me and other Radio Controlled Aircraft enthusiasts and let your friends know about the group!

Getting Ready for Float Flying


There are two things I have never done that I am getting ready to do. The first one is to fly an RC plane at sea level. The lowest elevation I have ever flown was in Las Vegas and I believe it was around 2,500 feet above sea level. I grew up in Spearman, Texas and the elevation there is a whopping 3,000 feet asl. In Salt Lake City, our modelport was at 4,500 feet. I even flew at a funfly in Evanston, Wyoming where the elevation is 7,000 feet asl but it was a hot day and the density altitude was almost 10,000 feet. My Bridi Killer Kaos flew okay there but I took my son's Alpha trainer off and as quickly as it got out of the ground effect, it came back down, refusing to fly! I am looking forward to seeing what kind of differences there will be here in the Orlando area. I think I know what to expect but am not positive.

The second thing I am about to do is to fly my RC plane off of floats. I absolutely cannot find a place to fly around my home except for the many ponds and lakes in the area. I have always wanted to do this but never lived in a place where enough water was close enough to be convenient. I bought some styrofoam floats off of Ebay and I am in the LONG process of fiberglassing them. When I get through, they will be tough as nails but I really hate fiberglassing. Unlike many of you, my fellow modelers, I don't have a lot of patience. I want to fly and I want to fly now! Every time I fiberglass the fuselage of an airplane, I swear I will never do it again. But, I wait long enough in between building and I forget just how badly I do hate fiberglassing! Well, with styrofoam floats, fiberglassing is probably about the only way to go to make them strong. I would think that wood floats would need to be fiberglassed too. I started off with fiberglass finishing cloth but have switched to 3/4 oz cloth. it is tougher and allos me to sand a little more deeply without cutting through the cloth. On the top of the floats, I am going to put some fiberglass tape made for joining wing halves together. With that, I will use some 1/8" ply to mount the landing gear. I converted the Tower Trainer to a taildragger and I had to add a gear block in front of the center of gravity for the main gear. I am leaving the main landing gear block for the rear landing gear for the floats.

For a water rudder, I am using a 1/2 A nosegear made by DuBro. I used a 1/4" piece of balsa and cut a groove about half way through it. Then I made a bend in the landing gear and cut off the excess. I shaped the balsa and then pushed the wire into the groove and then used baking soda and cyano glue to cement everything in place. I will cover this with fiberglass too. On the back of the left float, I epoxied a 1/8" piece of plywood and the gear's steering block simply screws onto the wood. Since this is the first time for me to fly on floats, I looked for some help on the Internet. I found an excellent page that shows how to do the set up. Take a look at it here. Hopefully in a week or two, I will have a report on how things have worked out. I already have a pond in site for the maiden voyage!

If any of you may know who put these floats out, please let me know.